✅ Now Live: Advanced Order Store for All Business Types – Rentals, Services, Subscriptions & More!✅ Now Live: Advanced Order Store for All Business Types – Rentals, Services, Subscriptions & More!✅ Now Live: Advanced Order Store for All Business Types – Rentals, Services, Subscriptions & More!✅ Now Live: Advanced Order Store for All Business Types – Rentals, Services, Subscriptions & More!✅ Now Live: Advanced Order Store for All Business Types – Rentals, Services, Subscriptions & More!✅ Now Live: Advanced Order Store for All Business Types – Rentals, Services, Subscriptions & More!✅ Now Live: Advanced Order Store for All Business Types – Rentals, Services, Subscriptions & More!✅ Now Live: Advanced Order Store for All Business Types – Rentals, Services, Subscriptions & More!✅ Now Live: Advanced Order Store for All Business Types – Rentals, Services, Subscriptions & More!✅ Now Live: Advanced Order Store for All Business Types – Rentals, Services, Subscriptions & More!
Margin
In this lesson, we will delve into the Margin CSS utility classes offered by Tailwind. These classes enable us to effectively control and customize the margins around elements in our web design, offering precise control over spacing and layout.
Just like padding, Tailwind CSS uses utility classes for margins, providing a systematic and intuitive way to apply spacing outside of elements. Let's break down the margin classes in Tailwind CSS:
- m-{number}: Applies uniform margin to all sides. Example: m-5 applies the same margin on top, right, bottom, and left sides.
Code Snippet
<div className='w-32 h-24 rounded m-5'>..... </div>
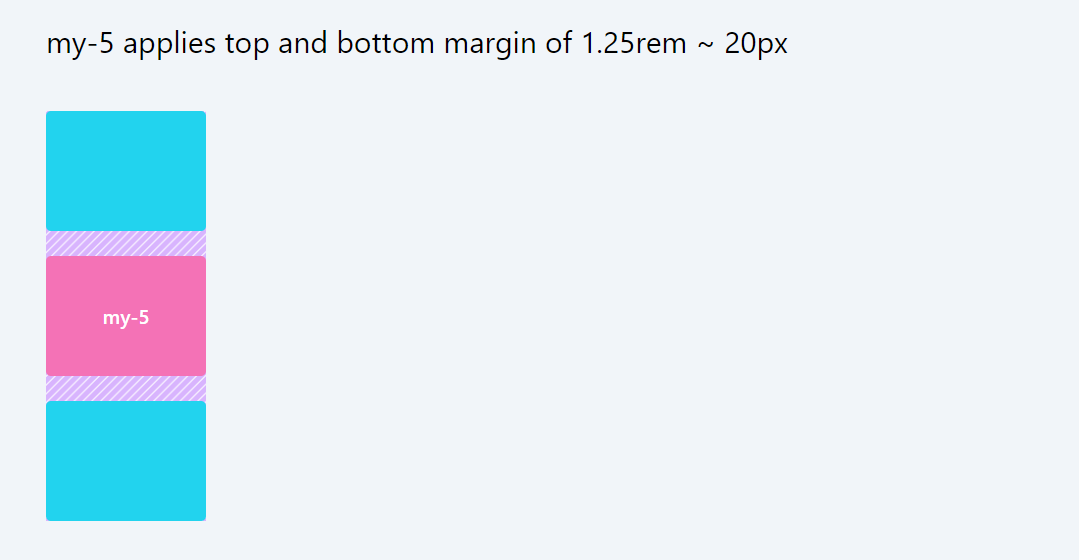
- my-{number}: Applies margin to the top and bottom sides (Y-axis). Example: my-4 applies margin to both top and bottom sides.
Code Snippet
<div> ..... <div className='w-32 h-24 rounded my-5'> ----- </div> .....</div>
- mx-{number}: Applies margin to the left and right sides (X-axis). Example: mx-5 applies margin to both left and right sides.

- ml-{number}: Applies margin to the left side. Example: ml-4 applies margin to the left side.
- mr-{number}: Applies margin to the right side. Example: mr-4 applies margin to the right side.
- mt-{number}: Applies margin to the top. Example: mt-4 applies margin to the top side.
- mb-{number}: Applies margin to the bottom. Example: mb-4 applies margin to the bottom side.

- m-px: Applies a margin of 1 pixel on all sides.
- mx-px: Applies a margin of 1 pixel on the left and right sides.
- my-px: Applies a margin of 1 pixel on the top and bottom sides.
For Inline Elements:
- ms-{number}: Applies margin at the start of an inline element. Example: ms-4 applies margin to the starting side (left for LTR languages, right for RTL).
- me-{number}: Applies margin at the end of an inline element. Example: me-4 applies margin to the ending side (right for LTR languages, left for RTL).
- ms-px: Applies a margin of 1 pixel at the start of an inline element.
- me-px: Applies a margin of 1 pixel at the end of an inline element.
Each {number} in the class name refers to a spacing scale defined by Tailwind CSS, usually in increments of 0.25rem (4px). So, m-4 would typically mean margin: 1rem (which equals 16px if the root font size is 16px).
These margin classes offer a convenient and consistent method to control the spacing around elements, aligning with the design system established by Tailwind CSS.
Using negative values
In Tailwind CSS, negative margins are used to move an element closer to its neighbor, effectively pulling it outside its normal flow in the layout. This can be particularly useful for overlapping elements or adjusting the positioning of an element relative to its surrounding content.
Tailwind provides utility classes for negative margins, similar to positive margin classes, but prefixed with a minus sign (-). These classes follow the pattern -m-{size}, -mx-{size}, -my-{size}, -mt-{size}, -mr-{size}, -mb-{size}, and -ml-{size}, where {size} is the magnitude of the negative margin.
Examples:
- -m-2: This class applies a negative margin of 0.5rem on all four sides of the element. In Tailwind, 2 typically stands for 0.5rem.
- -mx-4: This applies a negative margin of 1rem (since 4 in Tailwind generally equals 1rem) to both the left and right sides of an element.
- -my-1: Applies a negative margin of 0.25rem to the top and bottom of an element.
- -mt-3: Applies a negative margin of 0.75rem to the top of an element.
- -mb-5: Applies a negative margin of 1.25rem to the bottom of an element.
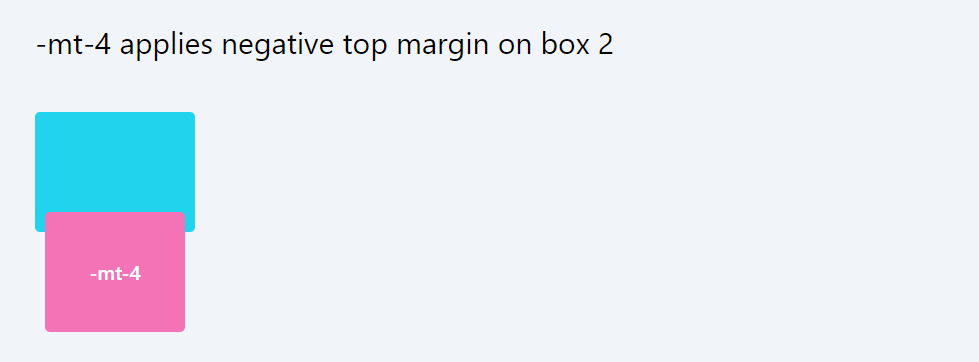
Imagine you have two div elements, and you want the second div to overlap the first one slightly at the top:
Code Snippet
<div className='w-2/3 flex '> <div className='flex flex-col items-center justify-center '> <div className='w-32 h-24 rounded ' > <div className='w-full h-full bg-cyan-400 rounded justify-center items-center flex text-white font-medium'> </div> </div> <div className='w-28 h-24 rounded -my-4'> <div className='w-full h-full bg-pink-400 rounded justify-center items-center flex text-white font-medium'> -mt-4 </div> </div> </div> </div>In this example, the second div (Second Box) will move up by 1rem (-mt-4), overlapping the bottom of the first div (First Box). This creates an overlapping effect, which can be visually appealing in certain designs.

Negative margins can be a powerful tool, but they should be used cautiously as they can lead to unexpected layout shifts or overlapping content, which can affect the overall design and user experience.
In this lesson, we will explore the concept of adding consistent spacing between items within a container. These spacing utilities are extremely helpful for achieving well-organized and visually appealing layouts, allowing you to control the distance between elements effectively.
All Modules